Showing posts with label Crafts. Show all posts

Wednesday, January 27, 2016

Basket of Sunshine

A close family friend and member of our church recently had surgery. To help brighten her day and cheer her up, my mom, sister and I put together a little Basket of Sunshine for her to help her on the road to recovery. 

We each did some shopping last week and picked out a few items that we thought she would like. All items were yellow or had yellow on them to go with the "sunshine" theme. The get well soon card I found even had a sunshine on it! 

Here's what our basket looked like along with a list of what we put in our basket. :-) She loved it and said it did brighten her day. 


They were all just simple items you can find at any Walmart, Target or Walgreens.


**Don't forget to Enter to Win a Free 16x20 Canvas from Canvas Factory here on my blog. You have until next Tuesday to enter!**

Wednesday, September 2, 2015

10 Gifts for the Grandparents

Grandparent's Day is this month, Sunday, September 13th. So after scouring Pinterest for some cute gift ideas, I thought I'd share a few of my favorites with you all as a friendly reminder of the special day.


My Dad (who loves nuts of all kinds) would love this gift.
Free printable found here.


I thought this would be really cute to frame and give to my mom or mother-in-law.
Free printable found here.


I love any gift with my kids handprints on it, so I know their grandparents would love that as well.
Idea found here.


Like I said, I love handprint gifts. ;-)
Idea found here.


A super cute sign for the grandparents. This can be bought here on etsy, or could be a really cute and fun DIY project with your kiddos.


My sister and I did something similar for our Mom for Mother's Day one year, and we later re-did it to add "Maw Maw and Papa" to cover both of them. We'll be re-doing it again soon when my sister has her third baby this Fall.
 Idea found here.


I thought this would be a super cute printable to print out and frame for the grandparents and it would be a fun way involve your kiddos in the gift.
Free printable found here.


If you've followed this blog for any length of time, you know I am photo-obsessed. So naturally, I think this would be such a fun gift to give to the grandparents.
Idea found here.


I thought this was super cute and can be found on etsy here. Or it would be very easy to recreate just using Photoshop or my personal favorite... picmonkey.com.


And last, but certainly not least, another gift more geared for grandpa is this cute little jar filled with is favorite goodies. :-)
Idea and free download found here.


I think any of these (or any one of the hundreds of other ideas on Pinterest) would be so cute and thoughtful as a gift for Grandparent's Day. Our kids' grandparents are so supportive and are always there for us to help out or love on our babies. They love their grandkids to pieces and Grandparent's Day is a great day to show them how much we love them back.

Wednesday, April 17, 2013

My New {Magnetic} Chalkboard!

My awesome sister, made me this super cute chalkboard for my birthday! I had been wanting to make a chalkboard for a long time, but just hadn't gotten around to it yet.

She found the frame at a thrift store for around $12 and just primed and painted it. Then she got a piece of sheet metal from Home Depot for around $10. She cut the sheet metal down to size and then primed it and painted it with chalkboard paint.

It is so cute! I absolutely love it. I made a little banner to go at the top, using my cricut. I hung the banner up using a couple magnets I had on our refrigerator. I would love to make or buy some other cute magnets to add to the chalkboard. I love that its magnetic.

I can't wait to decorate it for all the different holidays! 

(P.S. Does anyone know a good way to clean a chalkboard. I've just been using a wet rag but is there a better way?)

Thursday, March 21, 2013

Handmade Paper Bunting

When I saw this super cute paper bunting over at Rebecca's Blog (www.simpleasthatblog.com), I thought, I have to try and make one for myself. It seemed simple and easy to make, and it was just that... Simple and Easy!!

 I asked Jake if he had an old book he didn't care about anymore, and he did. ☺ So I cut out 18 pages from the book and cut the margins off the sides. I took 1 page and folded it in half and cut a triangle out of the bottom. I then used it as a template for all the rest of my pages. 


I used my cricut and "Make the Cut" software to cut out 9 hearts in each color of cardstock I was using. (These colors match our living room, which is where I planned to hang the bunting.)


After I had all the pages cut and the hearts glued on, I folded a little tab at the top for the paper to fold over the baker's twine I was using to hang the bunting up with.


Then I glued all 18 pages onto the baker's twine. (I guessed at how many pages I would need and thankfully I had just the right amount. How often does that happen??) (Rebecca stapled her pages to the twine and I see now that that is a better idea. Mine are already coming un-glued. I will be going back and stapling them.)

So here's my finished product!! I am really loving it! 


I'm linking up here:
Little by Little

and here:

Friday, December 21, 2012

Hand-Print Christmas Ornament

A couple of weeks ago, my sister and I made these cute little ornaments with our boys. We made three of each of them, 1 for us and 1 for each set of grandparents. ☺ 

We got the instructions here, from Pinterest. They were fairly easy to make, minus the non-cooperative 1 year old I was working with. He kept wanting to stick his fingers through the dough, which resulted in 1 or 2 re-dos of rolling out the dough. But it was otherwise, an easy project. I wrote his name and the year on the back with a black permanent marker so that we could remember when we made it.

Here is my sweet boy's, cute little hand-print. An ornament I will treasure forever. ♥


Friday, November 9, 2012

Saw It. Pinned It. Did It.

I'm linking up here for:

This was a pretty simple thing to do, and I'm really happy with the way it turned out. 

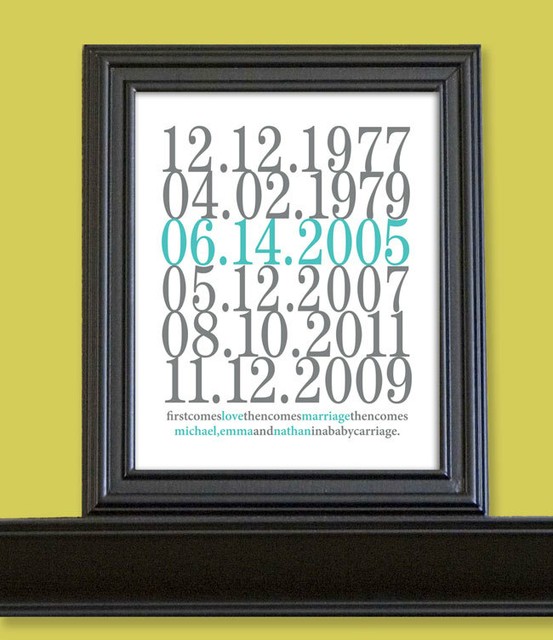
I saw this one on Pinterest and new I could try and make one for my own house. I made a much simpler one for our living room gallery wall when I first added the gallery, but I just used a simple font from word with no color. So I thought this idea was much cuter. I used PicMonkey to make the new one and then just had it printed at Walgreen's since I'm all out of ink in my printer right now. ☺

I changed up the font and added the date that Jake and I started dating, to fill up more white space. Plus the little saying at the bottom says "first comes love" so I thought that date should be on there! Here's my version, before printing and framing.

And here it is printed, framed and hanging on the wall! I love it and it was super easy!

So easy in fact, that I made one for my sister too, and I just might make a few more and frame them for Christmas gifts! 

 What have you been pinning and making lately?

Wednesday, May 16, 2012

Pinterest Mother's Day Project

I wanted to do something special for my Mom for Mother's Day from Jackson, so where else could I turn but Pinterest of course!

I had pinned several gift ideas for the Grandmas so I knew I probably had something pinned that I could make.

It was a toss up between these few pins.


I ended up getting my sister to help me and we made the second pin. Her oldest held a sign saying "WE", her youngest held a sign saying "LOVE" and then Jackson held a sign saying "MAW MAW". I think it turned out really cute and my Mom loved it, of course. :-)

I ended up buying a frame from Wal-Mart for $9.99, basically just like the one that was used in the picture above, and just added the three pictures. We just used white computer paper and a black marker. Landon did great, but it was a bit harder to do with the babies. As you can see in the pictures, Mason is trying to eat the paper, and this was one of the only pictures I got of Jackson where the paper isn't all crumbled up in his hands, Ha! 

But all in all this was a pretty easy (if you have older kids that is) little project and it turned out super cute!

Wednesday, April 13, 2011

Homemade Dog Collars

I don't know about your dog(s), but mine absolutely love to get new collars. I don't know why they love it so much, but they get so excited when I try to put them on. I guess they're like humans in that we love to get new clothes! :-)

I ran across this website and was looking at the dog collars that she's made, which are absolutely adorable!! I thought to myself, how hard can it be to make a dog collar. It seemed pretty easy from looking at them. So I googled instructions on how to make a dog collar at home and found this great tutorial. Though I have no idea how to sew, my sister has become quite good at it, so I sent her the tutorial and she said she'd try it. So I went and bought all the supplies, (which I found at Hobby Lobby) to make all 3 of my dogs a collar. They turned out so cute and my sister said it wasn't all that hard either, just a little time consuming. I'm thinking my dogs might need some cute 4th of July collars for the summer!! :-)

Hunter wearing his new collar. :-)

Libby wearing her new pretty collar.

Max wearing his new collar.

Monday, November 29, 2010

12 Days of Christmas Blog Challenge - Day 7: Holiday Craft

My church has a Christmas store every year where we make crafts and sell them. My craft has recently been these few ornaments!

For this ornament, you just buy some clear glass ornaments and then take strips of scrapbook paper and roll them individually on a pencil, then stick the paper into the ornament. You continue to do this til the ornament is filled up. I then tie a piece of pretty ribbon onto the top and I might also put a cute Christmas sticker on the front.

This isn't one we've made for the store because its so personal, but I've made them for my tree and I've made them as gifts. You just take a 2x3 acrilic stamp block (from Archivers) and a 2x3 wallet size photo. You buy some two sided tape sheets (also from Archivers) and you rub the tape onto one side of the block. You then set your picture, front side down onto the block and press firmly to make sure every part of the picture sticks to the block. Then I glue some ribbon all the way around the 3 sides and tie a pretty bow so that it can hang on your tree. I've also used photoshop to put the year on the picture so that I can always remember what year it was. I then put 4 little rhinestones on each corner for added decoration.

This is actually an ornament my made for our store a couple years ago. She just painted a penguin onto a light bulb and attached some ribbon to the top.

This is just a red ball ornament with a piece of 2 sided tape around the middle. You then roll the tape in black glitter and then use a gold glitter pen (stickles) to put the belt buckle on. Then you glue a white pipe cleaner to the top and add some ribbon.

 This is an ornament I just started making last year. I made this one Twilight themed for my tree, but we've made them Christmas themed for the store. You just poor a little bit of pledge floor wax, swish it around to get all of the inside covered, then poor the remaining pledge out. You then take any color of Martha Stewart fine glitter and poor it into the ornament. You will swish the glitter around to cover the whole insde of the ornament as well. Then put the top back on and add some ribbon to the front. You can also add some vinyl cut out using the cricut, or you can add a cute Christmas sticker.

This is an ornament I made last year for our store. I'm also making several more this year. Its just a cookie cutter with scrapbook paper glued around the outside edge. I used my xyron to glue the strip of paper on. I then tied a piece of matching ribbon onto the top and then I made a little bow and hot glued it onto the side along with a couple of little bells. I made these in several different shapes.

This is a craft my mom made for our Christmas store a couple years ago. Its just a stone paver from Home Depot or Lowes thats been painted to look like a snowman. She then tied some fabric around his neck and glued some pom poms onto his head and some wire to make them look like ear muffs.

And last, but certainly not least, my mom is making these glass block lights this year with a snow man face on them. We've sold several of them already and the store isn't even til this coming weekend. We just buy the glass blocks from Home Depot and drill a hole in the side of them. You then put a strand of 20-35 christmas lights in there. The face is put on using vinyl and the cricut. She also hot glued a sock hat on the top and tied a piece of ribbon around the bottom or you can also use a scrap of fabric or fleece for a scarf.

Thanks for looking at all my crafts and don't forget to link up here:


Thursday, April 8, 2010

Bulletin Boards for our Toddler Class at Church

My sister and I teach the toddler class at our church. We have 3 big bulletin boards in our classroom and since we've gotten the cricut, we've had so much fun decorated them. We wanted to change out our boards for Easter/Spring so we got some ideas online and put our cricuts to work this past Saturday. Here is what we came up with! Thanks for looking!

For this bulletin board we used our cricuts to cut out the letters (Pooh Font) and the bees (Walk in my Garden)

For this bulletin board we used Doodlecharms for the sunshine, Graphically Speaking for the clouds, Pooh Font for the title and Every Day Paper Dolls for the kites.

For this bulletin board we once again used the Pooh Font for the title. We cut out the popcorn kernels using the Make the Cut software (each piece of popcorn has one of the kids in our class' name on it along with the top two pieces having mine and my sisters names on them). The popcorn box was hand made by my sister and we used scrunched up white tissue paper for the popcorn in the box and just used a yellow marker to make it look buttery.

Thursday, February 18, 2010

Some more vinyl for my wall.

After using vinyl on my wall in my bedroom, I started thinking of other things I could do on my walls and I thought of this. I used my MTC program and my cricut to make these cuts. I think it turned out really cute!! Its in my hallway. Thanks for looking.